Not-So-Gross Anatomy: Abdominals & Obliques

While I sit here typing up this week's blog on abs and obliques, I cannot help but think about this scene from Crazy. Stupid. Love. in which Emma Stone's character sums up the situation pretty much spot-on.

The easy thing to say to a well-defined mid-section is one of two things:

Option A: "Damn! Looking great!"

Option B: "Genetics. Must starve themselves. No thank you."

While it is indeed envious to see somebody with a well-defined set of abs and obliques, there is little reason to be a hater. It takes a blend of hard training, sound nutrition, and genetics to make them a possibility.

We are talking about obliques and abs today in Not-So-Gross Anatomy. Beyond the quick anatomy lesson and exercises I want everyone who reads this to think a bit about how this can apply to their own training. Obsession is just a focused form of crazy and without the right eating and training (and genetics)  - finding those six-pack abs may be as likely as a unicorn delivering your pizza to you right now.

My point is to gather some perspective. Train hard. Eat right. Sleep well. Balance stress.....enjoy the development.

(stepping of the soapbox)

Let's look at anatomy. Think of the musculature resting on three layers - deep middle and superficial. The transverse abdominis is located deep and secures around the midsection. The muscle fibers run horizontally and the transverse originates along the illiac crest, to costal cartilage of ribs 7-12, the thoracolumbar fascia, and the lateral half of the inguinal ligament. The "TA" inserts into the xiphoid process, the linea alba, and the pubic crest.

I will translate into laymen's terms. It wraps around your midsection from the back around to the front and connects from sternum to pubic bone. It is the deepest muscle that we are talking about today. It's the spare tire that helps brace the midsection and spine when bracing or "bearing down"

Notice the striations of the muscle fibers as the TA wraps the body from posterior to anterior. (Custom Pilates and Yoga)

Notice the striations of the muscle fibers as the TA wraps the body from posterior to anterior. (Custom Pilates and Yoga)

On the middle layer of the abs & obliques is where you will find the rectus abdominis and the internal oblique. The rectus abdominis is what you may call the six pack, eight pack, the washboard abs, or in many cases the "well-upholstered" abs. Even if you cannot see them, they are in there (I promise). What gives the compartmental look is the linea alba and tendons that intersect along the rectus abdominis. Originating at the pubic symphosis and inserting along the 5th-7th ribs and the xiphoid process of the sternum. The rectus abdominus flexes the lumbar spine. 

muscles-of-the-abdominal-wall.jpg

The internal oblique is part of the "love handles". Its colleague is the external obliques and they form an anatomical weave to help the torso rotate and laterally flex. The internal obliques originate along the illiac crest and insert along the costal cartilage of the 8th-12th ribs and also the pubic crest. From the anatomical point of view, the internal obliques look like they are moving from posterior to anterior and fanning upward and down.

On the superficial layer, the external oblique resides. Originating along the anterolateral border of the lower 8 ribs (antero = front lateral = side) and inserting at the illiac crest, the pubic crest, and the font of the rectus sheath. 

The arrow depicts the external oblique (right side shown)

The arrow depicts the external oblique (right side shown)

Injuries can happen with these muscles and the most common injuries are oblique strains, sports hernias, and a condition called diastasis recti.

Oblique strains can happen from something as minor as twisting suddenly or can be more chronic in nature from repetitive motion (a throwing motion). The can be quite painful and frustrating and should seek medical attention to minimize further damage.

Sports hernias, a different thing altogether from hernias. A sports hernia is a tearing in the abdominal wall or the adbominal sheath. This is usually generated through powerful movements and requires a decent amount of rest before getting back into normative activities.

Diastasis recti, is a condition in which the linea alba becomes stretched or torn to the point of "splitting" the rectus abdominis. This can happen to mothers after pregnancy or after rapid or substantial weight loss. The pressure along the rectus abdominis and linea alba causes fibrous tearing and in some cases this may require surgery. In some cases, this condition becomes the "new normal" and some exercise modification may be required.

So hear are some ideas for an apparently healthy individual for the abs and obliques this week. Programming is critical and the benefits of compound movements to build stronger abs and obliques is vital. These entries are for that "little something extra" to challenge the area.

As always, thanks to The Energy Club for some of the shots.

Individualized programming at our "one stop shop" can get you dialed in for any goal!


Until next week's conclusion of Not-So-Gross Anatomy - I'm outta here!

-Don Bahneman


Not-So-Gross Anatomy: Lower Leg & Foot

This excerpt from an episode of Entourage depicts Johnny Drama and his perpetual quest for bigger calves. Always looking for that "edge" in life, Johnny has a strong opinion that larger calves is THE answer.

Now I am not going to go so far and say he is 100% wrong, but he is fighting an uphill battle. As with many of the things physical in our life, there is a genetic predisposition to have a certain type of physique. This is called somatyping. While discussions about endo/ecto/mesomorphs is a topic for a later date - let's condense things and say that your muscles have a genetic predisposition to be long and lean, thick or stocky, or more athletic and well-rounded. the lower leg musculature is no different. Sorry Johnny. 


Oh, you meant lower leg calves? Whoops....

Oh, you meant lower leg calves? Whoops....

With lower leg anatomy, we have to observe multiple joints that are crossed. The knee, the ankle, and the digits of the toes are all in play when talking lower leg musculature. We can break this grouping into anterior view, posterior view and plantar side of the foot (bottom). Technically we call the top of the foot a dorsal view but from an anterior view you can see what is need for the depth of this blog.

Anterior view of the lower leg:

The tibialis anterior is the largest muscle in this group. It has an origin along the lateral surface of the tibia and inserts on the medial aspect of the medial cuneiformand base of the 1st metatarsal. This is what actively dorsiflexes the foot and inverts the foot. Dorsiflexion is the flexion of the dorsal side, or top of the foot. Inversion of the foot is the elevation of the medial side of the foot.

There are the extensor group (hallucis longus and digitorum longus - not Harry Potter references). There job is to extend the digits.

The peroneals, AKA the fibular group (longus and brevis) are located on the lateral aspect of the lower leg. The Fibularis Longus originates along the upper lateral surface of the fibula and inserts on the medial cuneiform and the base of the 1st metatarsal Fibularis brevis originates just below longus and inserts on the styloid process of the 5th metatarsal.

Anterior view of the lower leg (Pearson Benjamin Cummings)

Anterior view of the lower leg (Pearson Benjamin Cummings)

Peroneus/Fibularis Group Origin/Insertion (CoreWalking)

Peroneus/Fibularis Group Origin/Insertion (CoreWalking)

Posterior view of the lower leg (Pearson Benjamin Cummings)

Posterior view of the lower leg (Pearson Benjamin Cummings)

Posterior View of the Lower Leg:

The Gastrocnemius is the most superficial muscle and usually the most prominent to the eye. It originates on the backside of the femoral condyles and inserts on the posterior of the calcaneus via the Achilles tendon. Yes - it crosses the knee AND the ankle. It helps flex the knee and also plantarflexes the foot.

The soleus is located under the gastrocnemius and originates along the upper portions of both the tibia and fibula. It also inserts at the posterior aspect of the calcanues via the Achilles tendon. This muscle does not cross the knee and is responsible for platarflexion.

Plantar view of the foot (Theratape)

Plantar view of the foot (Theratape)

The plantar view of the foot does not receive the necessary attention until it is usually too late. On the underside is where the flexor groups flex the toes but also this is where the plantar fascia reside. Through all the fun we have running, walking, jumping and doing God-knows-whatever else....the plantar fascia are being pulled. If they decide to strike - it can be a debilitating experience. Keep the toes and plantar fascia happy, my friends.  

Well-defined set of calves shown here....

Well-defined set of calves shown here....

.....and here as well.

.....and here as well.

Looking at mobility we need to consider loosening up the feet, the ankles, and knees to ensure all musculature has been given stimulus before strength training.


Mobility Patterns:


When looking at strengthening the lower legs and feet, you have some isolated options. But I need to ask how often are you only using this group in isolation? Many athletic based movements can call upon the lower limbs with great success.

The triple extension point of the lift draws explosive power from the ground vertically and the lower legs have a great amount of activation. In this instance, the gastrocs & soleus help propel upward and the tibialis anterior helps stabilize at the top.


Mix it up a bit with some single leg patterns, jumping patterns, and compound movements. When training kettlebells or deadlifts, try to lift with a flat shoe or barefoot (if gym allows) to help "root" yourself with the entire plantar aspect of the foot.


Keep on keepin on.....we are here to develop some science and structure behind you fitness and nutrition goals. Head to the one stop shop located in our main menu and get started today!


Best,

Don Bahneman

Not-So-Gross Anatomy: Biceps

Tickets for the gun show are available now online

Tickets for the gun show are available now online

This week we are talking about biceps here at b3 wellness. Some folks talk about biceps as if they are guns. 

"Hey, did you buy tickets to the gun show?"

or possibly

"Look at the frickin' guns on that dude?!"

If you are a pacifist, the term "guns" may not resonate with you in a positive manner. So, please allow me to translate....

"Oh my, shall we take a gander over there and pay homage to the stout biceps brachii on that fellow?"

or

"Hello miss. Can you explain to me and my friend how you developed such large and defined elbow flexors and supinators?"

biceps brachii 2.png

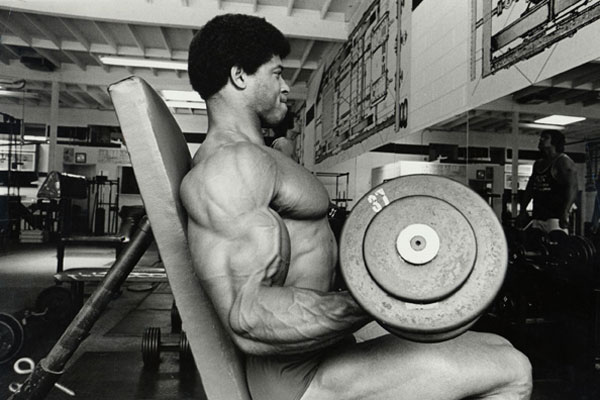
Let's talk shop on the bicep brachii. The "bi" in biceps refers to the number two. As in two heads of the biceps (long head and short head). The long head originates at the supraglenoid tubercle of the scapulae. The short head originates on the tip of the coracoid process of the scapula. The insertion points of the biceps brachii is  along the radial tuberosity and also alonmg the fascia of the forearm musculature of the biceps aponeurosis. Consider these locations making them "neighbors", but they do indeed have two distinct heads that perform a job as a unit. The biceps brachii flex the elbow and supinate the forearm. A flexed elbow and supine forearm are magnificently shown in the picture below.

preacher-curls.jpg

Another look at a peak contraction point for the biceps....I'm guessing you do not buy off the rack with those arms. Impressive!

billgrant6.jpg

When programming the biceps, you will want to take into consideration exactly what we are training and why are we doing it. For instance, the biceps will get a great deal of stimulus from pulling patterns. Yes - deadlifts, pull ups, chin ups, rows of varying angles, pulldowns. If you perform chest flyes, do your biceps engage? So be mindful of not asking too much of them throughout the week with a great deral of straight bicep training.

Other things to consider training the biceps at all points of their contraction potential. When deadlifting, the biceps are lit up like Las Vegas and this is with a fully extended elbow. Training at the most flexed position also holds value, as shown below with a flexed arm hang below in the exercise videos. But also training the muscle in all degrees of movement in between these two examples is where we can help shape, define, build, and train these muscles to look better, work harder, and perform better.

Like any muscle, when trained - but not stretched, these muscles can get tight quickly. SO the arms may look big and strong, but if the biceps are tight and immobile - you are losing functionality of the muscle in spite of vanity.

Let's take a look at some mobility patterns and self myofascial release (SMR) techniches to help loosen up:

Lats and biceps go together like pizza and beer, peanut butter and chocolate, or for you more healthy folks....hummus and pita bread?

The insertion of the pec minor and origin of the short head of the bicep are right on top of each other - so loosen up the chest!


Strength training the biceps is a bit more than just barbell curls. I am a big fan of barbell curls, just do not do it in the squat rack. Please do not be "that guy/girl" who curls in the squat rack. The preceding message was sponsored by the unified squatters association of the world.

The biceps need to be strong throughout a full range of motion. Yes, that means you can get some bicep benefits from the bigger lifts.


Start with a 10 second hold. Then 20 seconds. Then start adding weight. Really drive the elbows into the ribs and find your happy place.


Dumbbell preacher curls are a nice alternative to preacher curls with an EZ curl bar. Allows the lifter to concentrate on each arm individually.


Rack walks are a great conditioner and will test your grip in elbow flexion like few other exercises.


Straight bicep training is not something we get many requests for at b3. We tend to train movements and have traditional and non-traditional splits. Linear and undulation periodization work does provide some windows to insert bicep-specific work, but what we believe at b3 is simple - we do not sacrifice function for size. Bigger is not always better (regardless of what "they" say), deceptively strong will always have its place, and the biceps reputation of being just a "show" muscle is incredibly false. Train the body. Train the movement. Always moving towards the goal. 

Be fit. Be fueled. Be full of life.

Don Bahneman

Founder - b3 wellness

(photos taken from The Energy Club in Arlington, VA)

Not-So-Gross Anatomy: Pectorals

Dig if you will the picture.....Monday at any traditional gym. The electricity of the weight room floor. The tension. The excitement. All the dudes. It must be.....

Duh, Duh, Duhhhhhhhhhhh - CHEST DAY!

DFHTGh3XsAABIL1.jpg

(@20_omaralonso)

-------

"What do you bench, bro?"

-said by most dudes at one point in their life if they workout

-------

There are copious amounts of stereotypes in the fitness industry and when it comes to lifting, over-training the pectorals is near the top of the list. The pectorals (pec major and minor) are also affectionately known as the chest. A large chest helps fill out a t-shirt but does it help with your functionality? Something to ponder....

The pectoral group has significant value in movement and functionality. The caveat is that symmetry is important. What I am getting at is that we tend to overtrain muscles simply by how we function. How we sit. How we work, drive, eat, and unwind. As long as we are working towards a symmetrical body, I am on board with training any muscle group. But lifting chest 3 to 5 days per week, legs once and back twice is a recipe for disaster.

(brief interruption as Don hops off his soapbox)

Notice the pull line from the clavicle,sternum and ribs.

Notice the pull line from the clavicle,sternum and ribs.

Let's look at the anatomy of the pectorals and then dive into mobility and training movements.

Pectoralis Major is a large fan-shaped muscle that originates along the ribs, the sternum, and the sternal aspect of the clavicle. The pectoralis major inserts along the bicipital groove of the humerus. The pec. major is located under the breast. The pec major's primary functions are:

1. Flexes the humerus

2. Adducts the humerus

3. Medial rotation of the humerus

4. Stabilization of the humerus in the GH joint

Located under the pec major is pectoralis minor.  Pec minor originates on the front of the 3rd, 4th, and 5th ribs. It inserts at the coracoid process of the scapula. The function of pec minor is to protract the scapula and also helps with movement of the ribcage.

This is a very clean image of the 3rd, 4th, and 5th rib origin

This is a very clean image of the 3rd, 4th, and 5th rib origin

The pec minor has a great deal to say when it comes to the efficiency of the shoulder and rotator cuff. An overly tight pec minor is going to pull the scapula out of the normal alignment and hinder range of motion and function of the shoulder. 

Assuming that we do not change the desk jobs, the driving of cars, the way we eat, etc. - we are likely to have tight pectorals and diminished shoulder range of motion, which could alter thoracic mobility, which alter pelvic tilt, the the hips/knees/ankles do not stack up correctly and the whole damn thing is out of whack!!!!

An all time favorite line from Anchorman. Thank you God for Will!

Alright where was I? Ahhhh, the theatrical depiction of your body collapsing because you are too concerned about being swole versus balanced. Totally kidding aside here, without some semblance of mobility, you are going to look big but function less than 100%.


So let's get to some mobility work....


There are a few patterns that we use to get the pectorals ready for some press work.

Now, on to some strength training.


Now we need to briefly talk about angles. I know, I know....damn science always getting in the way. From a flat position or decline position - the pec major is heavily in play. As you incline you position, the pec major becomes less involved and the pec minor and anterior delts pick up the slack.

The say, (who is THEY btw?) variety is the spice of life. Choose different angles to train and different modalities to utilize.

Yes, barbell bench and dips are players in all this as well.....but consider the blog a tapas versions of how we do it at b3!


See ya next week!

-D

p.s. - Thanks as always to best gym in the DMV area - The Energy Club for the settings.

Not-So-Gross Anatomy: Deltoids

"If the weight of the world is resting on your shoulders, they better be damn strong."

-Jeanette L. aka My Grandma

boom.jpg

When I heard this statement I could not have been older than ten or eleven and I thought about this more literally than metaphorically. But boy, oh boy, was Jeanette on point with this statement in both contexts.

Metaphorically speaking, you need to be strong enough, callus enough, forgiving enough, and resilient enough to handle the obstacles that manifest during your laps around the sun. Literally speaking, if you have incredibly weak or imbalance shoulders, your quality of movement and upper body strength/power will be compromised.

Shall we talk deltoids? 

There are three heads to the deltoid group:

images.jpg

The anterior deltoids, the lateral deltoids, and the posterior deltoids all form the "shoulder". The anterior deltoid originates along the lateral end of the clavicle and inserts at the deltoid tuberosity on the humerus. When active, the anterior deltoids flexes and medially rotates the arm by pulling the humerus towards the clavicle.

The lateral (medial) deltoids originate at the acromion process of the scapulae and insert along the deltoid tuberosity of the humerus. The lateral (medial) deltoids abduct the arm by pulling the humerus toward the acromion.

Shoulder definition helps the arms and back look magnificent! We know delts at the b3 Lab!

Shoulder definition helps the arms and back look magnificent! We know delts at the b3 Lab!

The posterior (rear) head originate along the spine of the scapulae and insert at the deltoid tuberosity as well. Activation of the posterior (rear) deltoids extend and laterally rotate the arm by pulling the humerus toward the spine of the scapula.

The deltoids are interesting in that they are used for so many other movements. Many pulling actions done with the lats also include the posterior deltoids. Pressing movements that use the pectoralis major/minor also include the anterior & lateral deltoids. 

The anterior deltoid may very well be the most overused upper body muscles in the body. Think about your actions throughout a day. Do you brush your teeth? Eat a meal? Drive a car? Type on a computer? Scroll through your mobile? Push a door open? Push your chair away from a desk? Anterior deltoids are active through all of these. Poor posture and tight pectoral groups will alter the movement of the deltoids and this is mostly due to the "forward" leaning we do throughout the day.

With all of the activity to the anterior group, we need to give the posterior deltoids  some extra love throughout the week to help shape the shoulder and improve function.

Let's get into some mobility work:

Strength can be established through various modalities...let's see a few below to help round out the shoulders properly.

Overhead press work is a great way to develop deltoids. I do not care if it is barbells, kettlebells, dumbbells, bands, bodyweight, ViPR, or keg presses (sober, ideally) - an overhead press is a great grinding movement that will promote vertical strength and power and promote correct posture.

Supplementing the overhead press with lateral, front, and rear delt raises are tried and true to chisel out those deltoids. 

Knowing where and when to implement shoulder work into your routine is not a simple "one way" path. Assessing the mobility and strength of the delts, spinal posture, and yor goals all have a say in how we get after the deltoids at b3.


Thanks for reading this week's installment....see ya next time!


Be fit. Be fueled. Be full of life. b3 Wellness, llc

Don Bahneman MS, CSCS, CISSN, CPT, CHC


Not-So-Gross Anatomy: Rotator Cuff

SCUBA, TGIF, FBI, IRS, FUBAR, PBR, are all acronyms that many folks are familiar with. Anyone with a shoulder injury in their past of current situation is likely familiar with another acronym - SITS.

S - subscapularis

I - infraspinatus

T - teres minor

S - supraspinatus

picture provided by: Duncan Sports Therapy and Wellness

These four little muscles make up one of the more powerful labor unions in your body, affectionately known as the rotator cuff. When a problem arises with these muscles, there is likely a decrease in your productivity and functionality. 

The "cuff" is the deepest group of shoulder muscles that all originate on the scapulae and wrap around the glenohumeral (gh) head of the humerus.

Translation: The muscles start on your shoulder blade and wrap around the top of the arm bone. The primary goal of the cuff is to keep the arm nestled down and in the "shoulder joint".

Technically the rotator cuff secures the head of the humerus into the glenoheral joint and provide support around the capsule and allows the acceleration and deceleration of internal/external rotation of the shoulder, abduction of the shoulder, and stabilizes the shoulder girdle. 

S - subscapularis - located under the scapulae and connects to the lesser tubercle of the humerus. Primary function is to internally rotate the humerus.

I - infraspinatus - located along the infraspinatus fossa along the posterior of the scapulae and connects to the greater tubercle of the humerus. Primary function is to externally rotate the humerus.

T - teres minor - located along the lateral border of the scapulae and connects to the greater tubercle of the humerus. Primary function is also to externally rotate the shoulder.

S - supraspinatus - located along the supraspinatus fossa along the top of the scapulae and connects to greater tubercle of the humerus. Primary function is abduction of the humerus.

Keeping the rotator cuff working efficiently is about training movements, of course, but also doing so with optimal posture. This means effectively using stability and mobility throughout the body to allow the spine to be neutral allowing the scapulae to glide correctly and allow the sub joints of the shoulder to move in a way that make the rotator cuff work well. 

If nothing else, as you read through the "Not-So-Gross" series learn that the body needs to be trained in an integrated fashion. Poor thoracic mobility is going to alter shoulder function.

The next line of defense for support of the rotator cuff muscles are the rhomboids, the serratus anterior, and the long head of the biceps. These muscles have functions  that mimic and support the cuff with movement. We will table this for a future blog.....(that's called a teaser :-))

Mobility of the spine and shoulder are necessary when talking about the cuff. Here are some of my favorites to warm up prior to training:


Transitioning to a dowel for the next several movements to help allow greater tension into these muscles and movement patterns. 


Strengthening the cuff:

Suspension training has a place in cuff work as well.....


Resistance bands have been used for years on cuff strengthening and are still incredibly useful today. The pull, rotate, and press is a great movement that encapsulates many of the movements of the cuff. 


Bodyblades have a niche and I still use them with shoulder work. The constant tension really can light up the cuff and supporting structures. Here is a tapas portion of some bodyblade movements that can be applied.


The kettlebell is a rehab/prehab tool and magically can unlock shoulder dysfunction. An entry level movement, the halo, seems to offer internal/external rotation, abduction/adduction, horizontal flexion/extension......a little something for everyone. 


Few integrated movements can be used in every blog in the Not-So-Gross series, but the get up is one of them. All shoulder movements are in play here as well as proper spinal alignment.

Start with a shoe before you start loading up the bell, pretty please?!  Take a look back at our blog series on Deconstructing Kettlebells to get a deeper look at the get up.

Poor posture,acute injury,  overuse, alter kinematics, tight and weak muscles will lead you towards cuff issues. If you have been blessed with good shoulders - make 'em great with some cuff work at least once per week!

For our US based readers - Have a safe and happy independence day! 

Be fit. Be fueled. Be full of life. b3 wellness. 

Cheers,

Don Bahneman

p.s. - Special thanks again to The Energy Club and the b3 Lab for providing the spaces to shoot.

Not-So-Gross Anatomy: Lats & Upper Back

Last known photo of founder, Don Bahneman, without a shirt on.

Last known photo of founder, Don Bahneman, without a shirt on.

Pop quiz:

Question #1 - What is the only muscle that attaches the pelvis to the humerus?

3....2............1......................we will need an answer.

Latissimus Dorsi.

We. Have. A. Winner.

Question #2 - What muscle, when properly engaged can help the deadlift, the squat, the bench press, and improve your chin up/pull up strength?

Did you say "the lats"?

That is correct! Johnny, tell 'em what they have won!

Final Question - How's your posture right now reading this from a mobile device or sitting on a chair (be honest)?

-Did you say my head is tilted down, shoulders are forward, slouching just a weeeee bit?

We will keep the last question on the honor system, but effectively training the lats & upper back muscle is paramount to help keep whatever heights God has blessed you with staying upright.

This week's installment takes a quick look at anatomy of the major muscles of the upper back. After that we look at mobility patterns for this important group of muscles. And lastly, we will show a few movements that are near and dear to b3's hearts that will strengthen these lovely skeletal muscles!

Ready to get this going?

Anatomy:

Upper-Back-Muscles.jpg

The "Lats" are the glorious muscle that got this undergrad time in the cadaver lab with the graduate students waaaaay back in the day. Whew, I am thankful for that opportunity because muscles in 3D are a whole lot better that 2D to learn from. The lats run along the illiac crest, sacrum, thoracic spine, lumbar spine, the ribs, and finishes at the humerus. Now that is a helluva journey - quite similar to some commutes for you possibly, but I digress. This fan-like muscle covers a great deal of territory and extends the arm, adducts the arm, and medially rotates the arm as well. The lats are also considered a "core" muscle and helps stabilize the torso.

The rhomboids are a group of muscles (rhomboid major and minor) that are located along the spine and connect to the scapulae (shoulder blades) along their medial border. Their primary job is to allow the scapulae to retract. Think about trying to draw your shoulder blades back while keeping the shoulder down. That is by way of the rhomboids. Thank them for their efforts.

Now try that movement again but allow the shoulders to elevate as you attempt to drive the shoulders back. That transitions oh so nicely to the trapezius muscles. This is a superficial muscle group and originates up and down the spine and base of the skull and inserts along the lateral end of the clavicle (collar bone), the acromion process, and the spine of the scapulae. The traps have several movements that are critical for daily function. They extend the neck, laterally flex the neck, elevate, depress, and retract the shoulder as well.

Rear deltoids (back part of your shoulder) are included here as well. Wait, what? This is not about shoulders today....I know but the function of the rear deltoids fits more into aiding the upper back and their movements than the other two heads of the delts.

The last muscle for today is the teres major. Its junior, teres minor, is one of the four that make up the rotator cuff. Teres Major aides the Lats as a medial rotator and adductor of the humerus. Rowers, swimmers, bodybuilders, and anybody with a wide "V" taper to the upper body likely has great lats and teres major helps add a wider and thicker look to the back. Now that may not be appealing to all readers, but all the same, the teres major muscles are very important to have efficient functionality with for all activities of daily living.

Let's see how we can get these muscles ready for a workout with some mobility work.

Mobility:

Consider this an appetizer of some of the ways we warm up the body in an integrated fashion at b3.


Strength:

Again, this is a sampling of just a few movements that train the lats and upper back. And how these movements are applied is when the rubber meets the road in getting results. 

Now, finish reading this, turn off the phone, push away from the computer and correct your posture. Then head to gym and get these muscles working!

Until next time!


Be fit. Be fueled. Be full of life.

b3 Wellness

Don Bahneman

p.s. -The energy club is where these picture were shot at and you must stop by if in the NOVA/DC area!

p.p.s. - yes I love chin up/pull up, use a lat pulldown on occasion and even a seated row - but we are trying to get "outside" the normative tools.

p.p.p.s. - I sure hope the Nats can get Scherzer some run support immediately!  

Effective nutrient timing is a MUST for a good lift. Do not do this!!! Donut judge me, either. (shameless pun)

Effective nutrient timing is a MUST for a good lift. Do not do this!!! Donut judge me, either. (shameless pun)

Not-So-Gross Anatomy: Hip Abductors and Adductors

20180617_134741.jpg

As the royal artist, Sir Mix-A-Lot once put it, "I like large abductors and I cannot lie." 

What was that? That's not how the song goes? As a nerd of science, that is exactly how I hear that song!

I wish there was a hidden track talking about adductors with such adoration as well - but I digress....

This week's installment of Not-So-Gross Anatomy looks a bit at the booty and groin, the ass and inner thighs, affectionately known as the hip abductors and hip adductors.

New to the terminology of abduction and adduction? Abduction is the movement of taking away from the midline of the body. ADDuction is the movement of adding, or moving towards the midline of the body (Props to Dr. Street back at St. Cloud State University for the anatomy class back in the day of beepers and payphones).

Abductors:

The glutes (minimus, and medius) and the tensor fasciae latae (aka TFL) are the primary hip abductors. For today's post we will also include the glute maximus. While the maximus is a hip extensor, it is also present as a stabilizer for the integrity of the hip.

Hip abductors.jpg

Adductors:

The adductor group is made up of several muscles including adductor magnus, adductor brevis, adductor longis, pectineus, and gracilis. 

ce6e8383066e2f4693d4e4189e61f625.jpg

Adductor magnus originates along the ischial tuberosity and all of the remaining adductors originate on the pubis. They all attach along the linea aspera on the femur. While they are all not necessarily large muscles individually, they make a formidable group due to their compact origin.

Hip abductors and adductors play a significant role in unilateral training. When both feet are planted on the ground, the legs can rely on each other to provide an element of stability. By taking one leg off the ground, stability becomes more challenged and now the adductors and abductors are fighting to help keep the leg in check and balanced.

If you have any desire to move laterally, abductors and adductors are critical in allowing that to become a reality.As you step to the side while performing a lateral lunge, the leg that is stepping out is engaging the abductors to make this happen. The stationary leg is being straightened and the adductor group is being fired up in an eccentric fashion as well. 

See the demo of the lateral lunge. Click on the closed-captioning if you want the breakdown even further.

So let's talk about movements. Isolation of these groups can be done using the tried and true hip abduction and hip adduction machines. Side lying leg raises have some value as well. But I want to get into a few movement patterns to help keep movements integrated and provide the client more activation of muscle groups. Think of it like a good happy hour for your body. More muscles in same amount of time equals a happy camper!

Abductor mobility hinges greatly (total cheesy pun intended) on the IT band. As the TFL resides along the IT Band - if the IT is tight, the functionality of the TFL  is off. Translation....roll your IT band please!

Mobility:


Strength Training:


There are countless movement patterns to put the ab & adductors to the test, but here are some of movements I like to pull out and put in play with clients when deemed appropriate.

If you are looking for programming, look no further than b3 wellness. Customized and built around what you have access to. 

Thank you again for stopping by and giving this week's blog the ol' once over. Follow us on FB, Instagram, Twitter, LinkedIn, and Pinterest.

Be Fit. Be Fueled. Be Full of Life. b3 Wellness.

!Hasta Pronto!

Don Bahneman 

p.s. - the videos shot were done so at the best kept secret in Northern Virginia - The Energy Club www.theenergyclub.com 

p.p.s. - The picture at the top of this blog is not actually my ass, in case you were wondering ;-)

Not-So-Gross Anatomy: Quadriceps

Rectus femoris. Vastus lateralis. Vastus medialis. Vastus intermedius.

workout-leg-exercises_fa16128607.jpg

The quadriceps. The quads. Quadzilla. Quad City. The Quad City DJs. Thighs. Thunder thighs.

The front of the upper leg has many nicknames, but we will roll with quadriceps today. In the illustration, you will see each of the four muscles that make up the quadriceps shown independently. The quadriceps’ primary responsibilities are to extend the knee, flex the hip, and adduct the femur.

Breaking down what each of the quadriceps by origin, insertion, and action.

Breaking down what each of the quadriceps by origin, insertion, and action.

Each of the quadriceps muscles have different origins, but come together and share a common insertion (end point) in the patella tendon.

Look at how all of the quadriceps tendons congregate at the patella and then come together at the tibial tuberosity.

Look at how all of the quadriceps tendons congregate at the patella and then come together at the tibial tuberosity.

An important thing to pay attention to is how the distal tendons come to the patella (knee cap). The Vastus Lateralis comes in from the outside and even has a small connection to femur to cross the patella. Conversely, the vastus medialis comes from the inside. The rectus femoris and vastus intermedius comes in a more direct fashion over the top of the patella. This multi-angled approach allows more coverage over the patella (which is a good thing). But if there is significant imbalance with these muscle, or tightness with the IT band, we could be setup for some problems (patellofemoral, subluxing patella, tendinitis, chondromalacia, meniscus, etc).

When it comes to training the quads, being mindful of the mobility and stability through the hip and knee is vital. This means looking at the surrounding structures as well. A tight IT band can wreak havoc on the alignment of the quads and send you tail-spinning with pain and loss of function.

While programming is specific to what the demands of the individual - here are some of my favorite movements to help mobility and train the quads.

Mobility:


Strength:  


I love me some squats. Back squats and Front squats are staples for good leg development. While I prefer Front squats for quad development, many people feel uncomfortable with the barbell in the rack position. This could be from posture issues, lat tightness, weak core, wrist mobility issues, etc. Starting with a kettlebell goblet squat may be the better course.

Single-leg development is very important. We have a dominant side, and working to find symmetry is needed. Enter the Pitcher's Step Ups. This can be loaded or unloaded. The range of motion from the hip and knee is substantial.

Explosiveness is required from time to time (with individuals ready for it) and the loaded jump squat is an option that I tend to introduce to clients when they show that they are capable of doing so.

To take exceptional mobility, stability, strength, and power and wrap it into one movement would be something that like to call a "unicorn" around b3. The loaded pistol squat is a unicorn. Balance, control, mobility, stability, strength, and power all are called into play in this humbler of an exercise. 

While there are many modifications to the five strength movements, I wanted to display an offering of some great quad-heavy movements. If you are looking to isolate the quads then hop on the leg extension machine or do some straight leg raises while wedged against a wall at 90 degrees. The truth of the matter is that most movement requires integrated patterns from multiple muscle groups.

Next week - Hip Abductors & Adductors - Glutes & Groin

Until then, check out our site for high end programming and see ya next week!

Be Fit. Be Fueled. Be Full of Life.

Don Bahneman - Founder - b3 Wellness


Not-So-Gross Anatomy: Hamstring Movements

ee6b5c7e5476cf37d34ec0781a543a0f.jpg

Do you sit at work/school/bar?

Do you drive a car?

Do you rest in a chair?

Do you sleep in a fetal position? 

Yes to any of the above will result in tighter hamstrings over time. We need this muscle group (and all actually) to function in an optimum fashion when called upon. Effectively training this group calls upon training the muscle group eccentrically and concentrically through both the hip and knee.

Translation: if you are just doing seated leg curls, you are doing it wrong.

Mobility work and rolling is essential:

Now there is a multitude of ways to loosen up but I am a big fan of rolling and integrated patterns to help get the body ready for activity.

(Videos have been shot at the best place to workout in Northern Virginia - The Energy Club)

The foam roller allows us to seek out and destroy any of those hot spots that are lingering around in our body.

The cossack squat is a great movement in and of itself, but I love using it for mobility to loosen up the hips, the knees, ankles and fire up the lower body

I like to use the dowel/PVC/broomstick to use some leverage in some movement patterns. The dowel fold over provides some leverage in opening up the posterior chain prior to moving some weight around.


Strength Training the Hamstrings:

Again, I am coming primarily from an integrated point of view. Time is valuable and being able to get more accomplished in less time is incredibly valuable to many of my clients. If you remember yesterday and know how the biceps femoris, the semitendinosus, and the semimembranosus move - then we need activity that runs across the hip and knee. 

Kettlebell Swings - this is a great hinge movement and a staple for hamstring work @ b3

Single leg deadlift work (ipsilateral shown) is a great way to train the hinge unilaterally. Your stabilizing muscles definitely get the memo that something is happening.

I love me some deadlifts. Sumo/traditional/kettlebell/pause/snatch-grip/clean-grip all have a place near and dear to my heart - like pizza.

Stability ball hip press gives an alternate way to add velocity to a hip extension while allowing the knees to remain flexed throughout. A unique and effective way to say hello to the hammies!

Swimmer kicks allow a great opportunity to fire the hamstrings without needing an external load. It is also a great move to help clean up compensation patterns.

Oh, the love/hate relationship I have with suspension training. So humbling but soooo effective. Hamstring curls on the TRX are an eye-opener.

At the end of the day, training the hamstring group in isolation is not so easy to do. The glutes, the errectors, the gastrocs all have something to say about it. Not to mention the adductors and quads. But building strong hamstrings are essential for posture, balance, and anything powerful!

Thanks for reading this entry! Until next time....

Don Bahneman

p.s. - If you are interested in online coaching, click on over to our one-stop-shop and get programming and nutrition coaching to help get you to the next level.

Be fit. Be fueled. Be full of life. b3wellness

bbbwellness.com


Not-So-Gross Anatomy: Hamstrings

Deadlifts are a nice way to build up those hamstrings.

Deadlifts are a nice way to build up those hamstrings.

Thanks for taking a look at the first of our Not-So-Gross Anatomy entries on the b3 Wellness Blog.

We start off with a personal favorite of mine – the hamstrings, aka the back of the upper thigh, aka semitendinosus, semimembranosus, and the biceps femoris.

The hamstring group plays an absolutely vital role in how we function throughout the day. You would be hard pressed to move without them as the help you navigate walking, standing, hinging over, extending the hips, and flexing the knees.

hammys.jpg

With anatomy, understanding where the muscles originates, inserts, and functions helps develop a level of understanding that is critical for improving performance. For some performance can mean scoring the game-winning goal in a match. For others, performance may be simply getting through the day pain free.

The hamstrings group have the pleasure of crossing both the hip and knee joints. When looking at the diagram of the group, the biceps femoris (red highlight) are located laterally, the semimembranosus (yellow highlight) is located medial, and the semitendinosus (blue highlight) is between them.

Illustration has removed the glute. Never, ever, lose your butt! This PSA has been approved by b3 wellness, llc.

Illustration has removed the glute. Never, ever, lose your butt! This PSA has been approved by b3 wellness, llc.

The hamstrings also make up part of what is called the posterior chain. This “chain” is a linkage between the hamstrings, the gluteals, and the spinal errectors.

Common injuries to the area include tendonitis, and varying degrees of muscle strains. Commonly referred as “pulling a hamstring” is a bit of a washing over the injury. And effectively understanding what movements cause pain, can help identify a path to get back on the road to recovery quicker.

 Tomorrow’s installment will include movements to train the hamstrings concentrically and eccentrically. Mobility patterns and rolling will also be shown.


References:

Neumann, D. (2010). Kinesiology of the Musculoskeletal System: Foundations for Rehabilitation (2nd ed.). St. Louis, Mo.: Elsevier. 

Be....Something!

I remember at a young age being asked by adults this loaded question:

“What do you want to be when you grow up?”

whatdoiwanttobe.jpg

Without hesitation, my answer would be professional ice hockey goalie or baseball player. Now at a fairly young age I realized this was not going to happen for a bevy of reasons. First, I never played hockey and secondly, I was okay at baseball, but nobody was knocking down my door to become a major league baseball draft pick.

So I ask you the same question, what do you want to be when you grow up?

Now, you may already be “grown up” but I am talking about much more than a job or career….what do YOU want to be?

Too much of what is presented to us today needs to be diluted. Needs to be politically correct. Needs to not offend. Do you know what I say to that? Bullsh!t.

Many of the greatest minds were viewed negatively because of their actions going against the grain. Working within the societal norms does nothing to raise the bar.  As Ryan Gossling’s character in Crazy. Stupid. Love. so eloquently put it….”Be better than the GAP.”

gap.jpg

What is my point?

If you tend to blame others for your current state of affairs, own your choices and situations and get over it.

If you are unhappy with your current career path, make a change. It may not be for more money at first, but is happiness and health worth less than the almighty buck?

If you are sarcastic, then be sarcastic – but know when to use it to provide levity and laughs, not to harm. With great power, comes great responsibility.

If you believe that you can do anything that you were able to do when you were in your teens or early 20’s….let me know how that goes.

Own the changes that your body is making.

Own the experiences in your life that have molded your perspective on things.

Appreciate the version of you that you currently are.

I'm the best damn version of me today! 

I'm the best damn version of me today! 


If you do not approve of yourself. I have news for you…..nobody is going to change you EXCEPT you!

So be something! Something special! Something that others want to know! Something others will respect! Something others will hate because you have your sh!t together! Be something that fits you perfectly! And makes you happy to be you!

Being an asshole does not count because you are making somebody miserable to be happy.

Being understanding that you only have one go around on this rock and try to leave things better than when you arrived should be in the forefront of your choices.

So I have chosen (after a great amount of questionable choices) to be in healthy relationships with people that inspire me to be a more aware person. To be nicer. Less sarcastic at inopportune moments. To work with those that need help in being more fit mentally, physically and appreciate the journey along the way.

I challenge you to take a moment and reflect on your current state of affairs. After your reflection, ask yourself the very simple question….

“Are you where you want to be now that you are grown up?

If not, re-read this blog and reorganize your situation to get to your place of peace.

Be....Something....Special. We all deserve it.


Until Next Time,

D

mug.jpg

Deconstructing Kettlebells: Snatch With Success

Over the past five weeks, b3 wellness has broken down several of the essential movements of kettlebell training. Today's installment will take a look at the kettlebell snatch - which is very different from a barbell snatch. The kettlebell snatch is a ballistic movement that takes the bell from the ground to overhead in a continuous flow.

For those interested in learning more about kettlebells, there are two primary certification groups out there - Dragondoor's RKC and Strongfirst's SFG. Both of which are rigorous hands on experiences in working through many different techniques to clean up the basic patterns of kettlebell training. One of the testing protocols is the 5 Minute Snatch Test. 100 reps in five minutes. Men use the 24kg (53lbs) kettlebell and women use a 16kg (35lbs) kettlebell. This is NO JOKE. Having done the test for both my level one and two RKC certifications and teaching several of my trainers as prep - this is a good test of anaerobic power, VO2 max training, strength, and power throughout the body.

To learn the kettlebell snatch you must first be adept at single arm swings, cleans, overhead presses, and maybe explore the high pull before snatching. 

This fun, yet challenging exercise has a wonderful carry over effect to many activities (i.e. running, jumping, fighting, sports, etc.).

KETTLEBELL SNATCH

snatch start.png

1. Hike the kettlebell behind you, while driving your hips back, with one arm.

snatch hike.png

2. Snap your hips forward while quickly raising your hand up with a slight bend

    in your elbow (Called a "J")

high pull elbow break.png

3.  Punch through the kettlebell until it is completely over your head. During the punch, loosen your grip slightly to allow the kettlebell to move around your hand.

snatch punch thru.png

4. The bell should softly touch your forearm without banging (this can take some

    practice - so have some patience).

5. Make sure your elbow is completely locked out. Notice how the bell is behind the ear and the torso has a slight lean forward.

snatch finish.png

6. Lower the kettlebell back down in between your legs, with a slight bend in your

    elbow, to complete another repetition.

Alternatives - double kettlebell snatches, high pulls, snatch up to press downs


Now, the snatch may be something to work up to. The high pull is a nice transition movement that gets the bell higher than a swing but not quite to the overhead finish of the snatch. This movement is not used as much but has a ton of value in getting tempo down for higher volume snatch work. So without further ado....the high pull.


HIGH PULL


1. Hike the kettlebell behind you, while driving your hips back, with one arm.

high pull start.png
high pull hike.png

2. Snap your hips forward hard while quickly raising your hand up with a bend

    in your elbow. Your grip should remain firm on the handle.

high pull elbow break.png

4. Drive the elbow back behind the ear and absorb the momentum of the bell to complete the rep.

high pull finish.png

5. Lower the kettlebell back down in between your legs, and begin to straighten the arm, to complete another repetition.


If you have been reading from the first blog, we have discussed the bell, history, the holding positions, and the major movements associated with kettlebell training. We have not addressed some basic safety thoughts when training.

KETTLEBELL SAFETY

1. Training Area

a.       Open area that allows ample room for movements. 

b.      Make sure the surface you are training on is flat and not slippery.  If you are on a slippery surface make sure you are exercising on a mat. Rubber flooring is idea.

c.       Do not look directly at the sun or lighting when performing exercises that require you to keep an eye on the kettlebell over your head.  Turn your body away from the light if that is the case.

No....away from the light, my friend.

No....away from the light, my friend.

2. Proper Foot Wear:

a.       Barefoot training strengthens feet stabilizer muscles and ankles.  Shoes that work well are flat-soled shoes (i.e. Converse chucks, Vans, minimalist shoes, and most wrestling shoes). 

b.      Running shoes are the worst to train with due to the thick heel at the sole. A close second is high heels (even if that is your thing).

giphy.gif


3. Practice Safety at all times:

a.       Always respect the kettlebell and never allow yourself to get sloppy. Act as if the bell is 60kg/132lbs and commands your attention! When feeling tired it’s easy for your form to deteriorate so stop the exercise immediately. Stay focused on the lift. There is plenty of time to rest or hit up the phone ;-)

b.      After completing a high intensity drill do not stop cold with your heart beating out of your chest. Make sure to keep moving by jogging or walking around so that your heart rate can push the blood back to the heart.  Lying down or sitting are the worst things you can do because they force the heart to work too hard. Keep your joints loose and shake it out in between rounds as well.

4. Common Sense Training:

a.       Gradually increase to a heavier weight and higher rep numbers and sets. If you are working within a program with detailed rep/set/rest intervals - do not deviate. When just starting out be very conservative.  If you can’t walk the next day then you over did it and you only have yourself to blame.  There is a learning curve to starting anything new. Respect your body and ease your way into any program.

5. Protect your back:

a.       Kettlebell training will strengthen your back and open your hips, therefore protecting you and limiting your likelihood from future back problems.  Using abdominal pressure and tightening your glutes will not only provide some safety for your back, but will help brace your entire core. Always be sure you are squeezing your glutes at the top of all your hip snaps.  Your back and butt will thank you (maybe even some people after a few weeks)!

6. What if.....?

a.     What is the bell slips out of your hand?

b.     What is the bell is too heavy?

c.      What if  somebody walks in front of me?

Plan ahead for most situations that could happen and this should limit what will happen to you.


Now that you have seen the basic movements associated with kettlebell training, there are limitless variations and corrective patterns to help maximize your benefits and minimize your risk of injury.

If you are ready to take the next step in your training, visit our homepage and sign up for our FREE newsletter and also take a look at our 100% customized training for you at b3 wellness!


Be fit. Be fueled. Be full of life.

don-signature.png
headshotscsubkgnd.jpg


Deconstructing Kettlebells: Clean it Up, Press it Out

Over the past few installments of Deconstructing Kettlebells, we have explored the many holds and positions of kettlebell training, the deadlift, the swing, the squat, and the get up. Today we will dive into the clean and the overhead press.  


CLEANS

This exercise is primarily used to safely bring the kettlebell to the rack position as well as used as a gateway to other kettlebell patterns.  This can also be an exercise in itself once the form is grooved and the arc is tamed. The clean - along with the swing and snatch are common kettlebell ballistic movements.


1.      Place the bell on the ground and step in front of it.

2.      Reach back and grab the bell, while keeping your back and head straight.

3.      Hike the bell between the legs, ideally above the knees.

4.      Snap your hips forward, keep your elbow in, while guiding the kettlebell to your shoulder. Use your LEGS AND HIPS to clean the bell. Do no CHEAT CURL the bell to rack position!

5.      Make sure your wrist is in neutral position (straight).

6.     At the top the kettlebell should rest in the natural "V" made between your upper arm and forearm. Women: Make sure to rack the bell on the outside of the breast.  The bell should be held tightly against the shoulder. Men: Hand position is on the chest.  The bell is tightly pressed against the chest and shoulder.

7.      Roll the kettlebell and throw it back between your legs to perform desired reps.

VariationsDouble Cleans, Hand 2 Hand Cleans, Double Alternating Cleans, Bottoms-up Cleans

Some common issues with the clean are the following:

-elbow leaves side and the swing is long

-the kettlebell bangs against the wrist and arm

-wrist position is in excessive extension

- torso rotation

There are many correctives that can be applied by a qualified professional. One of my favorite ways to teach the clean is to go backwards from the rack position and work backwards from the drop.


OVERHEAD PRESS

The overhead press is a total body movement. The key to the overhead press (OHP) is in keeping whole body tension. When using the correct breathing and tension, you will find your lower body and core stabilizing to get the kettlebell safely over your head.


1.  Clean the bell to your shoulder. Starting position is in the rack.

2.  Keep your quads and glutes tight and press the bell up over your head to a locked out position. Your opposite arm should be out to the side to help with weight distribution and also be tight

3.  During the press up, think of using you lats to help guide you under the bell. HINT - the lats are the key to getting some big weights overhead ;-)

4.  At the top, the bell should be inline with the ears or slightly behind, elbow extended, shoulder packed.

5.   Slowly bring the kettlebell down to your shoulder. Repeat for desired reps.

Variations:

Double Overhead Press, See-Saw Press, Clean and Press, Thrusters

Because of the asymmetries I tend to see in clients I prefer using kettlebells and dumbbells for overhead pressing movements. The offset weight of the kettlebell helps open up tight shoulders. And once the client is able to get the lats to incorporate into their press work - a whole new world opens up!

Next week, we will dissect the kettlebell snatch and also take a look at safety requirements when working with kettlebells. Go to our home page and sign up for our weekly newsletter - it's free and comes out every Wednesday!

Until next time....Be Fit. Be Fueled. Be Full of Life. 

Deconstructing Kettlebells - GET UP. STAND UP. The TGU

If I told you to lay down on the ground in a supine position (on your back) and hold and arm extended vertically with a kettlebell and stand up completely without bending that arm holding that bell - you may think this is a dare or riddle. In a vague way, I would be asking you to perform one of the oldest exercises around - the Get Up, also known as the TGU, or Turkish Get Up.

The TGU is movement that requires the body to handle stability and mobility throughout the entire kinetic chain, while challenging the core, motor development, and whole-body integration. The TGU is also used to help break down "weak links" and be used as a corrective strategy in some practices. I will use this as an assessment tool occasionally to look at my client's progress.

The shoulders are a very complex body part and they have the most to gain from TGUs. the shoulders can do many things. They flex, extend, hyperextend, internally rotate, externally rotate, abduct, adduct, horizontally extend, horizontally flex, scapular depression, scapular elevation, scapular protraction, scapular retraction. And guess what...they do all of this in a single move. Yup. The get up.

Add to it that the TGU loads the body in an asymmetrical fashion and that does a helluva number on the core musculature. The center of gravity is always changing with the TGU, thus the core is always adjusting to find balance. Add into in all three planes of action are being tested - and your core is more than stimulated during the TGU.

 TGU - TURKISH GET UP, GET UP

Pick Up to Get Up Sit Up (Steps #1-#6)

1. Lay on back and have a bell sit at your side just below chest height

2. Roll onto side and grab the bell with the hand closest to ground first, then wrap top hand over it, knees are flexed

3. Engage the core, roll back onto back, press the bell over the chest. Keep a neutral wrist position.

4. The knee should be flexed and hip slightly abducted on the side with the bell, opposite leg is extended and abducted

5. Initiate a punch with the loaded arm across the body to start the movement pattern back up

6. Roll onto the elbow

Tall Sit (#7)

7. Then transition to an extended arm and grounded hand

Transition to Half Kneel (#8-#10)

8. Provide a hip bridge (high or low) and bring the long leg back to the posterior

9. Sit back into the heels and remove the grounded hand for support

10. Windshield wipe the back leg and now hold a position of grounded knee

Stand Up (#11)

11. Stand up with the bell still overhead throughout

NOW WE NEED TO GET BACK DOWN - CONGRATS ON BEING HALFWAY THERE! (#12-#19)

12. Step back and kneel with the opposite leg - KEEP AN EYE ON THE BELL AT ALL TIMES

13. Twist the back leg towards the front leg (called windshield wiper)

14. Place the free hand down on the ground as you sit you weight back towards the heels

15. Take the leg that you stepped back into the lunge with and push it through to the front in full extension

16. Sit the hips down to the ground

17. Take the grounded hand and shift the weight to the forearm as you begin to lay flat

18. Transition the weight from the elbow to the shoulders as you should be laying flat on the ground

19. Repeat for desired reps and repeat on opposite side

No problem, right?

Wrong....

Before you decide to run out there and try this with a loaded kettlebell, execute the perfect TGU with a shoe. To learn the balance and control necessary for an effective TGU, make a fist and balance your shoe on the fist. After you can navigate the TGU with the shoe, on both arms, then we can start talking about loading the bell.

Check out the video showing the SGU, Shoe Get Up. please also take a brief moment to appreciate the Donkey Kong Vans ;-)


Now the many steps of the TGU can be used as individual exercises be very effective improving your fitness. Variations of the TGU are holding the bell with a bottom's up hold, a no-handed get up, and a double bell get up, along with other hybrid movements as well.

Next installment of Deconstructing Kettlebells will take a look at the clean and the overhead press.

If you are looking to make that serious change to your health & fitness, get customized programming from the b3 team today!

Sign up for our weekly motivation newsletter on our home page, bbbwellness.com , and we will see you next time.

Be Fit. Be Fueled. Be Full of Life.


Deconstructing Kettlebells: Squats

In the previous installment of Deconstructing Kettlebells we looked at basic hinge patterns, AKA the deadlift and the swing. In this week’s blog we tackle squatting patterns – looking at the goblet squat, the front squat, and the pistol squat.


Squatting is an essential movement pattern. Squats hold benefits for walking, climbing, stepping, sitting and standing, and lower body strength. In addition, the squats introduced today also will help develop core muscles through abdominal pressure in how we will hold the kettlebell(s). 


Now, I love me some barbell squats, and I love deadlifting even more so, but kettlebell squats are NO JOKE and can take your training to another level!


GOBLET SQUATS


The first item up today will be the goblet squat. When introducing squats into a kettlebell program, this is usually where I begin (assuming they have cleared screening and show reasonable mobility).


Top of the goblet squat

Top of the goblet squat

Bottom of the goblet squat

Bottom of the goblet squat

Goblet Squats

1.      Find a shoulder-wide stance, while planting your heels on the ground firmly.

2.      Grab the kettlebell along the horns and hold in front of the chest. Do not rest the bell on the chest.

3.      Make sure your toes are tracking you knees, you may need to slightly turn your toes out (external rotation).

4.      Push your hips back and lower the body down slowly.

5.      Go as deep as you can control, which may require you to open your knees more.

6.      Keep your head in a neutral position and your spine as straight as possible.

7.      Brace your core and stand up.  Squeeze your glutes and quadriceps at the top.

Variations

Bottoms up goblet squats, Front Squats using 1 or 2 kettlebells, Overhead Squats using 1 or 2 kettlebells, Pistol Squats


FRONT SQUATS


Front squats are one of my favorite moves. First, because of the offset positioning the bell is (which kicks your core's ass). And second, they are very humbling for those that have lived under the leg press and barbell to change things up a bit.


Top of the front squat called the rack position.

Top of the front squat called the rack position.

Bottom position of the front squat

Bottom position of the front squat

Front Squats

1.      Find a shoulder-wide stance, while planting your heels on the ground firmly.

2.      Grab the kettlebell with one hand along the handle and hold in the rack position. The bell should rest in the natural "V" provided by the forearm and upper arm. The thumb should be able to touch the collarbone. Women, the arm position may flare slightly to accommodate for the chest

3.      Make sure your toes are tracking you knees, you may need to slightly turn your toes out (external rotation).

4.      Push your hips back and lower the body down slowly. Reach with the unloaded arm to help maintain alignment.

5.      Go as deep as you can control, which may require you to open your knees more.

6.      Keep your head in a neutral position and your spine as straight as possible.

7.      Brace your core and stand up.  Squeeze your glutes and quadriceps at the top.


Variations

Front Squats using 2 kettlebells, Overhead Squats using 1 or 2 kettlebells, Pistol Squats


Note:

With both the goblet and front squat, notice the parallel lines that are created by the tibia (large bone of the lower leg) and the spine. This shows a good squat depth and is an indicator of sufficient mobility and stability in the body.


PISTOL SQUATS

The pistol squat is a movement that is very challenging on many fronts. Balance, mobility, stability, strength, and concentration all have a roll in effectively navigating the pistol. There are many precursors and compensatory movements that we implement when learning a pistol, but I felt compelled to introduce this movement. The pistol is not for everyone and should not be used as a party favor or bar trick ;-)

Pistol Squats

1.      Take a narrow stance, while planting your heels on the ground firmly.

2.      Grab the kettlebell along the horns and hold in front of the chest. Do not rest the bell on the chest.

3.      Extend one leg in front of you and balance on the grounded leg.

3.      Make sure your toes are tracking you knee, you may need to slightly turn your toes out (external rotation).

4.      Push your hips back and lower the body down slowly. As you lower down, the elevated leg may rasie up and not touch the ground.

5.      Go as deep as you can control, which may require you to open your knee more.

6.      Keep your head in a neutral position and your spine as straight as possible. Use the kettlebell for counterbalance if needed.

7.      Brace your core and stand up.  Squeeze your glute and quadriceps at the top.

Variations

Bench Pistol Squats, Double Kettlebell Pistol Squats, Deck Squats, Pistol Deck Squats


There are dozens of variations of lunge patterns, step up patterns, and correctives for an improved squatting technique. The goblet and front squat are a great foundation for new kettlebell training participants and strength training enthusiasts. The pistol is an advanced movement and should be treated as such. 

Next installment of Deconstructing Kettlebells will cover the TGU, Turkish Get Up, or the Get Up.

Sign up for our weekly motivation newsletter on our home page, bbbwellness.com , and we will see you next time.

Be Fit. Be Fueled. Be Full of Life.


Deconstructing Kettlebells: Deadlift & Swings

Last week we introduced the kettlebell and the various holds that are associated with kettlebell training. This week in b3 wellness's Deconstructing Kettlebells series we take a look at basic hinge patterns - the deadlift and the swing.

Before we get rolling into the movements, let's take a moment and talk about footwear and kettlebells. The best footwear for kettlebell activity is a flat shoe/minimalist shoe or if you have the ability to go barefoot - have at it. The reasoning is we want you to feel rooted to the ground with the entire foot. A pair of chucks works well if you are in a gym setting that frowns on you showing off your "little piggies" on their floor. A shoe with a large heel will change your trajectory on ballistics and could wreak havoc on your practice.

Kettlebell movements are divided into two primary categories - Grinds & Ballistics. Grinding lifts are the squat, the deadlift, the overhead press, and the get up. These are slow and methodical in nature. Ballistic movements are the swing, the clean, the high pull, and the snatch. Ballistics are explosive in nature.

When used correctly, the kettlebell can provide a sinister blend of conditioning and strength training. Today's blog is not about programming, but simply about learning how to correctly deadlift and swing the kettlebell.

SWINGS

This is the foundation of ballistic kettlebell exercises. the swing teaches a powerful hip snap along with conditioning, and strengthening the body.  This swing is the gateway drug to cleans, snatches, pulls, etc in kettlebell training. But even a foundation movement such as the swing has some precursors.

Learn to crawl, before you walk. And the process begins with Step 1 - the deadlift.


Step 1 in learning the kettlebell swing is grooving the kettlebell deadlift:

Figure 1 - The setup on a kettlebell deadlift. 

Figure 1 - The setup on a kettlebell deadlift. 

Figure 2 - The Figure 4 position of a deadlift

Figure 2 - The Figure 4 position of a deadlift

Figure 3 - Top position of the kettlebell deadlift

Figure 3 - Top position of the kettlebell deadlift

Deadlift

1.      Take a comfortable stance a slightly more than shoulder width apart, toes pointed forward.

2.      Place the kettlebell in between your legs. The bell should be lined up with the ankles (medial malleolus if you are feeling saucy)

3.      Find the crease in your hips and shift your butt back directly behind you as if sitting in a high chair.

4.      Keep your head in neutral spine during this time, while maintaining a natural curve in your lower back. (Figure 1)

5.      Slowly reach for the bell, with your knees slightly bent as you push your hips back. This is called your “Figure 4” Position and it should be tight to maximize your hinge. Take a breath in and hold it. (Figure 2)

6.      With your heels planted, pick the bell up and squeeze your glutes and quads at the top. In addition, try to bend the handle of the bell with your hands, this will fire the lats, shoulders, and triceps to help make the entire chain of muscles engage.(Figure 3) Exhale as you near the top of the movement with a small, compact breath out (you may even make a small "teh or tuh" sound.

7.      Lower and repeat. Maybe even smile....

8.      As the set concludes, you may notice the bell finishes further back than where it started. That is not a bad thing. If posture and execution of the movement are correct, this shows an improvement in mobility – There is nothing wrong with a little progress!

The kettlebell deadlift can breakout into many different variations including bulgarian deadlifts, deficit deadlifts, suitcase deadlifts, single leg deadlifts, double kettlebell deadlifts, etc. etc.


Two-Arm Swing

Once you have mastered the kettlebell deadlift you are ready to try the swing. We will get into the two-arm swing first. There are many variations and the two-arm is the launching pad for many others. The swing is a blend of tension and relaxation all in the same rep. 


Figure 4 - Two Arm Swing Setup

Figure 4 - Two Arm Swing Setup

Figure 5 - The hike

Figure 5 - The hike

Figure 6 - The top of the swing.

Figure 6 - The top of the swing.

1.      Take a comfortable stance a slightly more than shoulder width apart, toes pointed forward.

2.      Grab the bell along the handle with both hands (overhand grip) (Figure 4) Take a breath in and hold it briefly.

3.      Hike the bell back behind you while actively bringing your hips back. NOTE: Hike the bell above the knees but be kind to the pelvic region. Think of this region as the triangle that the bell must pass through for an efficient rep. (Figure 5)

4.      Drive through your heels and snap your hips all the way forward, while keeping your arms shoulder packed and your head up. Exhale as the bell leaves the hips from the snap. The exhale should be small, yet powerful.(Figure 6)

5.      Make sure you squeeze your glutes tight and lock your knees out. Bend the handle to help keep the shoulders packed.

6.      At the top of the swing there should be two lines – One line from the ankles through the ears and a line from the bell through the shoulders. (Figure 7)

7.      The power driving the bell up is your hips, not the arms!

Figure 7 - The two lines at the top of a swing (one-arm swing shown).

Figure 7 - The two lines at the top of a swing (one-arm swing shown).


One-Arm Swing

The one arm swing is a more challenging movement as now we have half the grip holding the bell, and we also have to fight the rotational forces provided by the off-centered load.

Figure 8 - The setup for a one-arm swing

Figure 8 - The setup for a one-arm swing

Figure 9 - The one-arm swing hike

Figure 9 - The one-arm swing hike

Figure 10 - The apex of the one-arm swing

Figure 10 - The apex of the one-arm swing


1.      Take a comfortable stance a slightly more than shoulder width apart, toes pointed forward.

2.      Grab the bell along the handle with one hands (overhand grip). Opposite arm is tight and to the outside (Figure 8) Take a breath in and hold breifly.

3.      Hike the bell back behind you while actively bringing your hips back. NOTE: Hike the bell above the knees but be kind to the pelvic region. Think of this region as the triangle that the bell must pass through for an efficient rep. (Figure 9)

4.      Drive through your heels and snap your hips all the way forward, while keeping your arms shoulder packed and your head up. Exhale as the bell leaves the hips from the snap. The exhale should be small, yet powerful.The "free arm" can travel with the bell as shown to help keep tempo. (Figure 10)

5.      Make sure you squeeze your glutes tight and lock your knees out. Bend the handle to help keep the shoulders packed.

6.      At the top of the swing there should be two lines – One line from the ankles through the ears and a line from the bell through the shoulders. (Figure 7)

7.      The power driving the bell up is your hips, not the arms!

Hand to Hand Swings, Overhead Swings, Over-Speed Swings, Band Swings, Double Kettlebell Swings are just a few of the swing variations that are out there. Get your head wrapped around the two swings shown here first before you start venturing off the reservation with the alternatives.

I enjoy using most everything when I train people- barbell, kettlebells, bodyweight, suspension training, small apparatus, etc. What is great about the kettlebell is great because of its diversity and space saving capability. I can train a client in a 7 x 7 space and not miss a beat.

Next week the Deconstruction will look at the squatting patterns with kettlebells. We offer specialized kettlebell programming and customized programming for your fitness and nutrition needs at b3 - thanks for reading!


Be fit. Be fueled. Be full of life.